DES100: DIGITAL ANALOG
BRIEF:
Create a 3D model of a virtual object in Rhino then reproduce it as a physical card model.
SKILLS: COMPLETION DATE: SEM 1, 2024 - CAD: Rhino
- Paper Modeling
- Paper Crafting
- Photography
PART 1: RHINO MODELS & DRAFTS
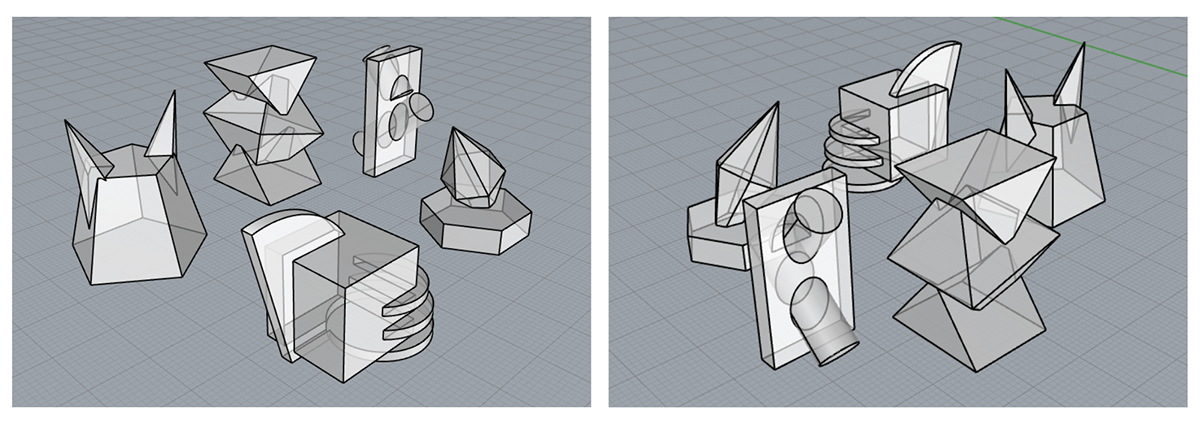
I was somewhat experienced with Rhino before starting this project, using commands like BooleanUnion to join objects into one shape. At the start, I was creating different shapes with objects and deciding which design would work best for a physical model.
GAP
PART 2: CHOOSING THE SHAPE

Of the five designs, I decided on this one because of its asymmetry and the visual effect it creates as three shapes layered on top of one another. It also fits neatly inside a 300 mm³ box and intersects two or three three-dimensional geometric primitives at non-perpendicular angles, satisfying the requirements for this assignment.
GAP
PART 3: FIRST ITERATION
I decided to ensure the object's functionality and familiarize myself with the complete procedure and every part of this shape using standard paper in my first iteration. Thanks to this hands-on approach, I understood how the parts fit together and how the model would work in its actual form. I can improve the design and identify challenges by testing with paper before moving on to a more solid material.


After finishing the first iteration, I found several problems, including gaps, too much glue that made the paper ripple at the borders, and parts of the model that needed to be folded more. I intend to tackle these problems in the next iteration since I have identified areas that require improvement. To be more accurate and complete, I plan to use a craft knife instead of scissors to cut the tabs and use a ruler to fold the tabs to produce sharper folds and neater cuts. This modification aims to improve the prototype's overall quality and solve the found flaws.
GAP
PART 4: SECOND ITERATION
I changed to thicker card paper for my second iteration instead of printed thin paper, as the card paper closely mimics the material of my final model. However, handling this heavier material meant I had to be more precise when cutting and pay more attention to details when crafting. Even though it was more difficult, switching to card paper made it possible to depict the finished product accurately and gave vital information for future improvement.


In conclusion, the switch to a heavier paper presented difficulties in the second iteration, making modelling more challenging than it was on the thin paper. The next iteration will need stronger glue because the increasing thickness necessitated masking tape to support the model. Despite these obstacles, I obtained essential knowledge for improving the next iteration.
GAP
PART 5: THIRD ITERATION
In the third iteration, I removed all the unnecessary tabs and made significant improvements with sharper edges for a more polished look. I improved my crafting technique by properly gluing the bottom sections of each element first before joining the sides, and using UHU glue instead of PVA glue to achieve faster drying times and stronger bonding. This led to a more accurate and sturdy construction than previous iterations.


To sum up, the third iteration demonstrated significant advancements with smoother edges and better construction. Achieving smooth connections between every component is still tricky, though. To fix this, I want to score my tabs lightly in the next iteration to ensure smoother connections and neater folds. Even with its remaining flaws, the model is substantially more refined than it was previously, especially with the substantially neater edges.
GAP
PART 6: FINAL MODEL
In this last iteration, the gaps and edges were improved. It was made possible by scoring the tabs and implementing new techniques, such as ensuring the bonding is correct before adding the next piece. I also made touch-ups with a toothpick where necessary, which produced a final model that was carefully created.
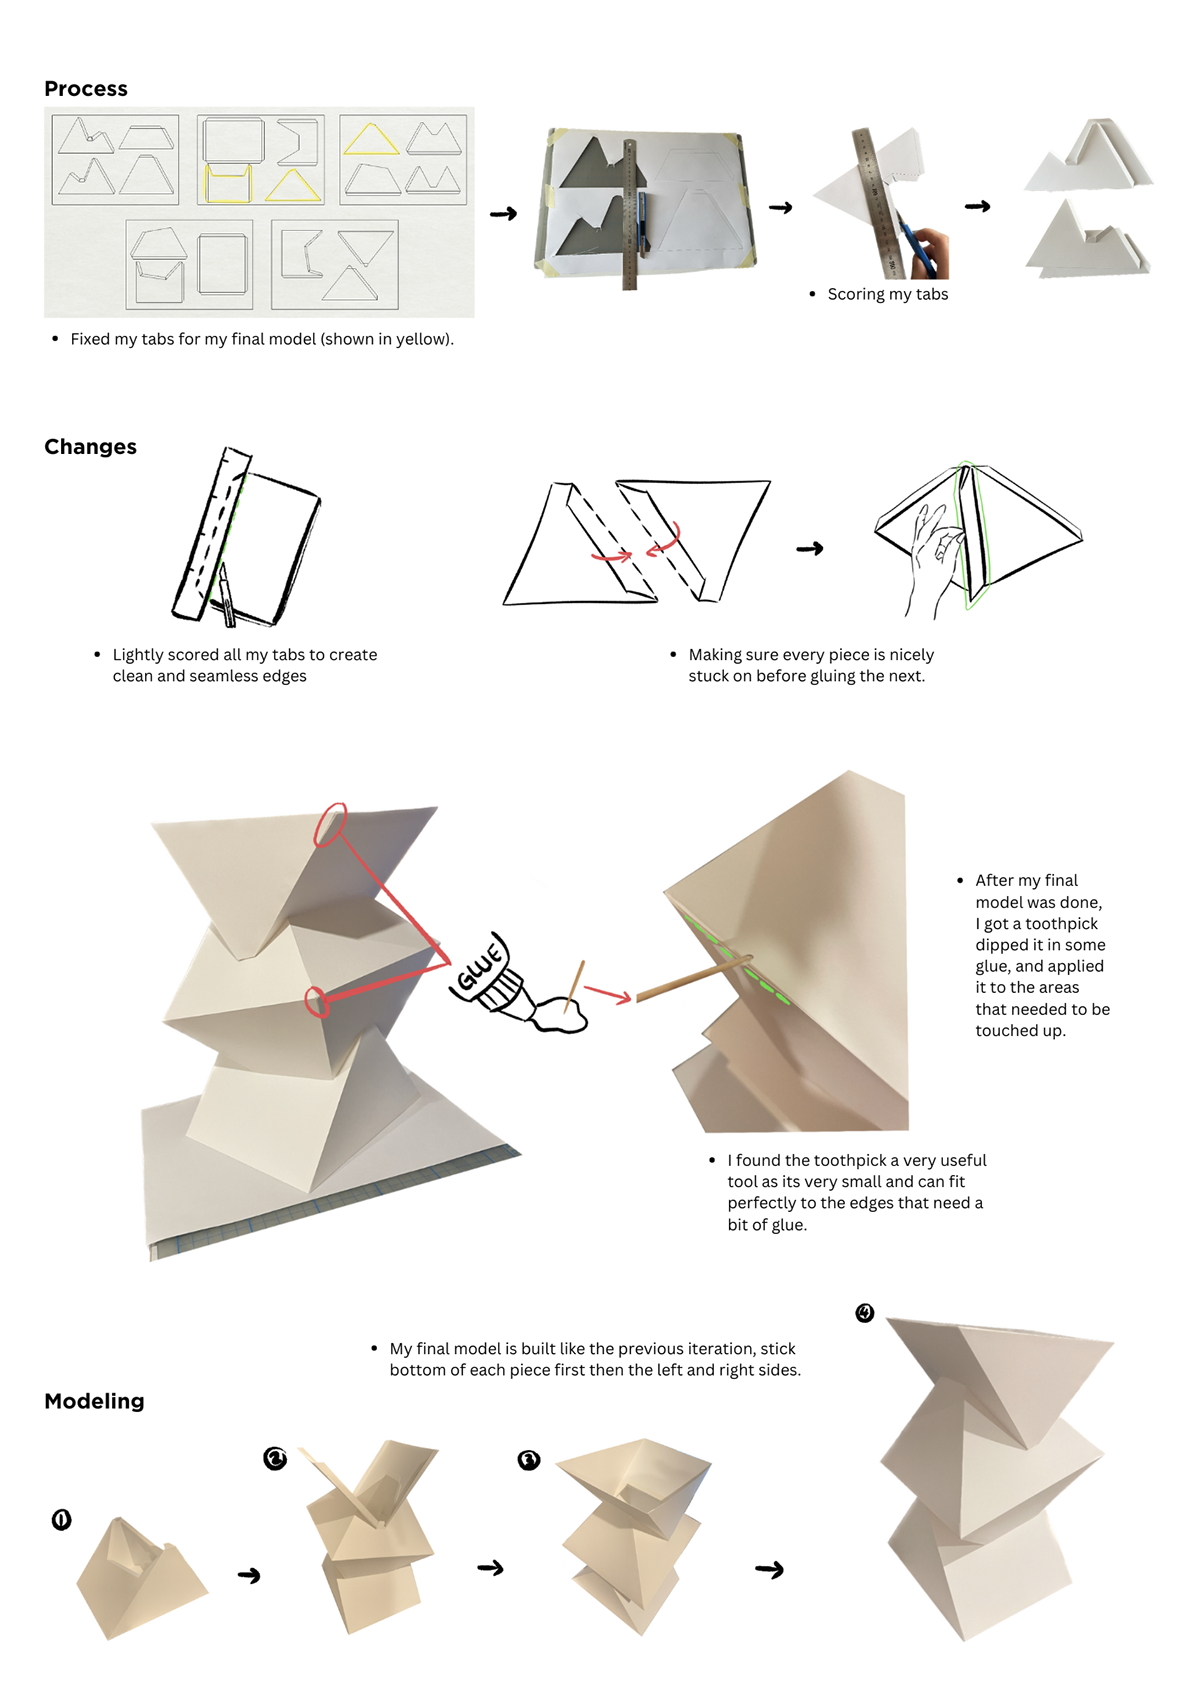
Ultimately, my final iteration represents an iterative process of refining where input and guidance from earlier rounds were essential. By scoring strategically and carefully, I created a model with minimal gaps and matched edges. This iterative process emphasizes the value of persistence and continual improvement, resulting in a final model that exhibits precise execution and a dedication to perfection.
GAP
FINAL MODEL PHOTOS
In order of scale, shape, and craft


FINAL REFLECTION
I've gone through an incredible learning curve while gradually creating my final piece, which has expanded my understanding of model construction and craftsmanship. During my first iterations, I ran across issues with gaps between pieces, fragile connections, and misaligned edges. Every iteration, nevertheless, offered a chance to grow and learn.
In my first iteration, I experimented with regular paper to understand the model's structural components and aesthetic considerations. Even though I ran into problems like too much glue and crooked folds, I discovered how vital accuracy and attention to detail are, and how important material choices and tools used would effect the final outcome.
Moving to thicker card stock presented additional difficulties in the second iteration, necessitating a more sophisticated manufacturing technique. Although stability was improved in this iteration, I also learned that stronger adhesives that provided better support were needed for the model.
My skills had improved by the third version, which produced smoother edges and a more polished look. Still, creating smooth connections between every component remained difficult.
All the knowledge I had gained from the preceding iterations culminated into the final iteration, which produced a model with concealed gaps and aligned edges. This result was primarily the result of accurate crafting processes and the strategic application of scoring.
This iterative approach has improved my technical proficiency and broadened my understanding of the artistry and craftmanship involved in model production. With persistence and constant pursuit of development, I've discovered that skill and technique are as crucial to craftsmanship as patience and attention to detail. My sense of accomplishment and success in producing a finished product that showcases my commitment to design and model-making has been infused by this experience.


